How to Build an Effective Scenario-Based Learning Activity
This article expands upon the ASC ODE article, “Scenario Based Learning’s Potential for Online, Asynchronous Learning and Beyond”, which explores the evidence behind the effectiveness of Scenario Based Learning (SBL) in building higher-order thinking skills and the ways in which such a strategy can support student learning and engagement, particularly in online, asynchronous environments. The article here will dive into the actual design stage involved in crafting an SBL activity, as well as considerations for which supported tools are best suited for delivering SBL activities online.
As an introduction to this resource, and in an effort to provide a succinct summary of the article linked above, Scenario Based Learning (SBL) is an active learning strategy that guides learners through simulated events via the incorporation of narratives and authentic, or real-world, contexts. SBL:
- has proven effective in building higher-order proficiencies, and other highly sought-after transferable skills,
- necessitates intensive effort dedicated to planning, testing, and implementation from instructors to effectively execute, and
- requires additional considerations such as which supported tool will best serve the activity needs and meet the learning objectives, what additional instructions will need to be provided to learners to ensure clarity, and where and how will the activity be delivered.
SBL Development Frameworks: ADDIE and EMERGO Methodology
Developing an SBL activity is not unlike designing a new course. The same sorts of backwards design strategies used in planning academic courses can ensure that the design of the scenario-based activity will be both efficient and student-focused, leading to the achievement of desired learning outcomes.
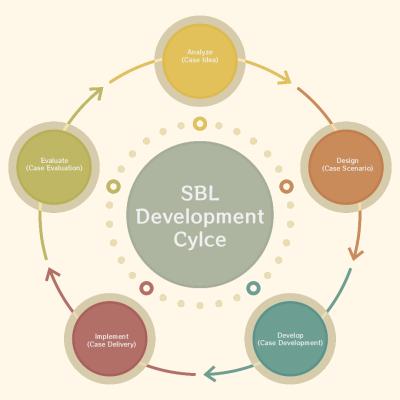
One specific backwards-design style framework that has been used to guide the development of SBL activities is referred to as the EMERGO methodology [1] EMERGO is founded on the principles of a well-proven instructional design model known as ADDIE [2], an acronym that stands for Analyze, Design, Develop, Implement, and Evaluate.
EMERGO takes the ADDIE cycle and extends it to simulated tasks and environments. Each phase of the EMERGO methodology is described below, with the greatest attention being given to the Design and Develop stages, as these tend to be the most challenging of the cyclical steps.
Step 1: Analyze
The development of any SBL activity should begin by analyzing the why: Why is this activity needed? Why is SBL well-suited to this task or assignment? In short, this initial step equates to the articulation of the broader goals and subsequent learning outcomes desired as a result of the particular exercise.
As you contemplate and begin to draft your goals and outcomes for the activity, here are a few questions that may help you get started:
- What technical skills do you want students to gain by completing the activity?
- What transferable skills, higher-order cognitive thinking, do you want students to practice and develop?
- What principles of quality online teaching and learning and Universal Design for Learning are most important to you to consider and apply within this activity and what challenges or limitations might arise regarding their implementation? (e.g. community building, student engagement, motivation, metacognitive practices, instructor presence, transparency in design, multiple means of representation, etc.)
- How will the achievement of goals and outcomes be assessed?
- What prior knowledge might students need to complete the task?
- Will the activity serve as a stand-alone task or as an introductory exercise to a large assignment?
- How does the activity figure into the overall student workload estimation?
Be sure to document and save your responses to these and other pertinent questions, along with the goals and outcomes that they help to shape. You will use these responses and established outcomes as a guide throughout each of the following stages.
For more about the types of situations that may be well-suited to SBL activities, be sure to explore this specific section in the ASC ODE Scenario Based Learning’s Potential for Online, Asynchronous Learning and Beyond article.
Step 2: Design - The 5 Cs of Scenario-Based Learning
Once you have completed the analysis stage and established your goals and outcomes, it is time to start designing the activity by mapping out the framework and inner workings of the scenario. But where do you even begin?
The EMERGO methodology chunks the Design stage into three scaffolded steps that can help to streamline the activity creation process. These three steps include laying out the following: 1) the Framework Scenario, 2) the Ingredients Scenario, and 3) the Detailed Scenario.
The Framework Scenario
The Framework scenario functions as a general outline or template that helps to structure the final detailed activity. The framework will generally consist of one or more blocks containing five core types of elements, helpfully referred to as the 5Cs of Scenario Based Learning3. The 5Cs are:
- Context: This includes any background information, such as place, situation, time period, etc. that help to establish and frame the challenges and choices that students will face.
- Challenge: Challenges are the specific problems and questions that will test students’ technical understanding and/or ability to think critically.
- Choices: The choices are the possible pathways and solutions that students will encounter in response to the challenge.
- Consequence: Each choice is followed by a consequence. Consequences can be positive or negative, and of varying degrees. These are the points in the scenario where feedback happens, allowing students to check their understanding and progress, and reflect on the outcome of a specific decision.
- Contemplate: Contemplate may refer to several smaller direct moments invoking reflection through direct instructor feedback or reflection prompts. This element could also appear in the form of a larger reflection question related to the experience of the activity as a whole.
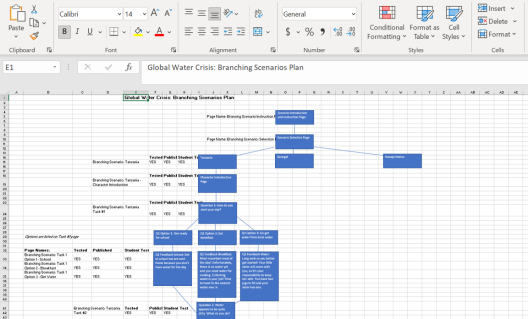
As part of this step, it is helpful to map out each of these elements in a basic outline or visual flowchart, either via pen and paper or by using an online tool like Microsoft Word, Excel or Visio:
As you begin to organize your activity:
- Think first about the challenges that you want students to encounter, those concepts that speak directly to the learning outcomes and that will provide evidence that students have met those outcomes. List out those challenges to determine how many you will need to include and in what order they might appear.
- Next, consider what background knowledge and context might help to frame the challenges that students will face. What information might students need to help them think critically about the events at hand? Then, work your way through the choices. What are some possible, realistic pathways that may stem from the challenge in question? Try to keep the number of options limited to three or four so as not to overwhelm and complicate the actual development process and overall size of the scenario.
- Finally, consider, at a global level, what feedback and reflection questions will be associated with each decision. Will the feedback be positive? Negative? Will students earn higher points for choosing one path over another? Where might you incorporate prompts for deeper reflection?
The Ingredients Scenario
After you have outlined the framework scenario, it is time to begin adding some surface-level details to each element. Here, you will consider things such as what specific tasks students might complete, (e.g. completing a puzzle, interacting with a virtual tour, conducting Internet research, etc.) what tools and resources might you consider using to complete the tasks, in what format information might be presented, and the amount of flexibility students have (i.e. can students navigate backwards within the scenario you design to quickly try again or do they need to work their way through an entire path before making a second attempt? Do they need to get an answer correct before they can proceed to the next challenge? Etc.).
The Detailed Scenario
The last step of the design stage is to fill in the gaps. This is where you will identify, collect, and/or create the content that will be used to develop the scenario. This includes writing out scripts for any videos that might need to be created, collecting a list of resource links that will need to be shared, locating and saving visual elements, etc. It is also at this point that you will identify and select the specific tools that will be used for each element. For example, if you are incorporating your own videos, what will you use to record, store, and share those video files? If you need to incorporate fill-in-the blank or multiple choice questions, what quizzing tool or features will you use?
Step 3: Develop - Choosing the Right Platform for Delivery
Following the design stage comes the development stage. This is the point where you bring all of the individual pieces together into a working draft of an interactive activity and run the activity through multiple rounds of testing to ensure functionality and accuracy.
When it comes to developing a digital branching scenario activity, there are currently three primary tools supported either by the university or the College of Arts and Sciences that we recommend for the creation fo SBL activities. Each one of these tools contains positives and negatives that must be weighed against one another to determine the best platform for your specific activity. The advantages and disadvantages of each are outlined below.
SBL activities can be designed directly in Carmen by creating individual Pages and strategically linking them together to form various pathways.
Pros
- Consistency: Instructors and students of online Ohio State courses are likely already familiar with Carmen and its general functionality.
- No need to learn additional tools: No external tools are required, which means there is little to no learning curve when it comes to the technology used.
- Independence: Instructors can create and manage basic pages and link them without having to rely extensively on external support.
Cons
- Difficult to grade and associate with points: Because the activity relies on several Pages that are linked together, it is difficult, if not impossible, to associate these activities with points and the gradebook without complex workarounds and less-transparent navigation, which could result in a high level of confusion.
- Understanding student use is a challenge: For similar reasons to the point above, gathering statistics on how and which students are working through these activities is very limited and difficult to gather, which may make it more challenging to evaluate the effectiveness of the activity in an online environment.
- Limited to multiple choice or true/false: Relying on linked pages, generally means that any questions incorporated in the activity must be either multiple choice or true/false.
- Clunky and not well-suited for larger scenarios: Building SBL activities in Carmen requires a great deal of organization. The developer must keep track of each and every page name and where that page links. This organization must be done outside of Carmen, as Carmen itself does not contain the types of visual flowchart layouts that other SBL tools include. Furthermore, making updates to page name after they have already been linked elsewhere can create difficulties. When page names change, any corresponding links will break if the name change is not reflected in all linked locations.
- Lacking in User Experience: Unless you are familiar with some HTML code, basic pages in Carmen do not offer the best User Experience.
- Potential for decreased motivation: The lack of visual variety can negatively impact student engagement and motivation.
For more details and a video tutorial that demonstrates how to build branching scenarios using Carmen Pages refer to the ASC ODE article Enhance Your Course Design and Increase Student Engagement with Creative Carmen Pages
Pros
- Integrated with Carmen and the gradebook: By incorporating Goal Point blocks, students receive points when they make certain decisions or achieve certain goals. If the activity is set up as a Carmen assignment using the ThinLink integration, points will automatically transfer to the Carmen gradebook.
- User-friendly platform: Both from the developer’s side and the participant’s side, the ThingLink platform is very intuitive and easy to use and does not require a large learning curve.
- Visual organization: The interface incorporates a visual flowchart and color coding to make it easier to visualize and keep track of each block and connection within the scenario.
- Flexibility related to content: You can embed or link to just about anything in ThingLink, including external images, videos, and audio files, other ThingLink scenes and virtual tours, etc.
- Timers: Of the three tools discussed, ThingLink is currently the only one that allows you to add timers, either to the entire scenario, or to individual blocks. This can be particularly helpful for lower-stakes exercises where you want to provide added challenges.
- Detailed statistics: Within the ThingLink Scenario Builder you can turn on advanced tracking to view details about how your students are interacting with the activity, either as a whole or by individual user. You can see things such as each path a student took, the most common paths taken, and average time spent on an individual block.
- Independence on the part of the instructor: Instructors within the College of Arts and Sciences can manage and design scenarios on their own. But they also have the option to add collaborators for additional support or collaboration across courses.
Cons
- Some limitations to question types: You can incorporate true/false, multiple choice, and open-ended questions directly in ThingLink. However, open-ended questions must be answered correctly before a student can proceed.
- Limits to customization of settings: Some general settings, such as the text of the Proceed button, are not fully customizable.
- Points are taken as a percentage: ThingLink calculates the final points a student earns as a percentage of the total points included in the scenario. If you are building a scenario where students don’t necessarily need to complete every pathway or you want to have different pathways be worth a different number of points (e.g. one pathway may be more correct than another), this may lead to an inaccurate or misleading final score, as it will overwrite the point total added to the Carmen assignment and reflect the total points contained within the scenario itself.
Pros
- Integrated with Carmen and the gradebook: Points can either be calculated by assigning a total to the end of a complete pathway or they can be calculated dynamically by incorporating quiz questions throughout. These points transfer automatically to the Carmen gradebook as a total point value.
- Flexibility in terms of question types: H5P allows for the most flexibility in terms of questions. Multiple-choice, Select All, True/False, and Fill-in-the blank can all be incorporated in H5P without the requirement that students answer correctly before proceeding to the next task.
- Visual variety: Content can be displayed in a variety of layouts, combining multiple forms of media in a visually clean and engaging way.
- Customizable settings: H5P provides a good deal of customization when it comes to general settings, such as the text that appears on the beginning and end screens or on navigation buttons.
- Detailed statistics: H5P contains detailed reports for branching scenario activities that have been added via the Carmen integration. Through these reports you can see information by student such as the number of attempts made, the time of both the first and last attempt, the first, last, best, and max scores, the total time spent on the activity, and the individual answers selected for each question or branch.
Cons
- Some limitations in terms of content: The types of content that can be embedded in H5P are a bit more restricted. You can incorporate videos, audio, images, and text. You can also link to a variety of content, but you generally cannot embed external content in an H5P scenario unless you have the actual media file on hand and can upload it to the platform.
- Some limitations to scoring: While the variety of questions and overall score transfer to Carmen function rather well, points are limited to either being set at the very end of the scenario or by incorporating quiz questions. It is more difficult to award points after individual branching actions and requires some workarounds.
- Higher dependency on external supports: Content created in H5P (following standard operating procedures and agreements with the ADA Coordinator’s Office to ensure security and accessibility for students), must be created and managed by ASC ODE Instructional Designers. Thus, instructors must depend more heavily on collaborative efforts with external partners to develop and manage SBL activities using H5P. This also means that any data reports associated with the content are collected and managed by the Instructional Designers. If an instructor wishes to view the statistics, they must first reach out to the ASC ODE Instructional Designer to request access to the specific data report.
Additional details and content examples utilizing H5P can be found in the ASC Resource article H5P: A Tool for Creating Interactive Course Content.
Steps 4 & 5: Implement and Evaluate
The final steps in developing an effective SBL activity are to implement the activity in the classroom and evaluate whether or not the activity achieved the goals and learning outcomes set forth in the analysis stage, identifying areas for adjustment and improvement going forward. It is also beneficial to gather qualitative feedback from the learners themselves to gain a holistic view of their experience in terms of engagement, functionality, ease of use, and even their own self-assessment and perception of their personal skill development.
Additional Resources and Support
For additional information about Scenario-Based Learning and helpful frameworks, we encourage you to explore the following resources. If you would like additional support in developing an SBL activity, our Instructional Designers are here to help brainstorm, collaborate, and offer additional support. Request a consultation today!
Resources
- Scenario Based Learning’s Potential for Online, Asynchronous Learning and Beyond
- ThingLink: Creating Scenario Based Learning Experiences
- Enhance Your Course Design and Increase Student Engagement with Creative Carmen Pages
- ThingLink: An Interactive Tool for Instructors and Students
- H5P: A Tool for Creating Interactive Course Content
References
[1] Nadolski, R. J., Hummel, H. G., van den Brink, H. J., Hoefakker, R. E., Slootmaker, A., Kurvers, J. H., & Storm, J. (2008, September). EMERGO: A methodology and toolkit for developing serious games in higher education. SIMULATION & GAMING, 39(3), 338-352.
[2] University of Washington | Bothell. (2023). Information Technology. Retrieved from ADDIE https://go.osu.edu/ChWU.
[3] ThingLink. (n.d.). Creating Scenario Based Learning Experiences. Retrieved from thinglink.com: https://drive.google.com/file/d/1qxPrdw2LnIU-Xj59CIKvfs1onKFikOA5/view?pli=1