Creating and Using a Flexible Syllabus

Using a flexible syllabus (sometimes referred to as a “liquid” syllabus) as one facet of dynamic course design provides the means for introducing responsive, ongoing communication and adjustment based on the distinct needs of each unique learning community. The value of adopting a flexible syllabus platform is that it allows for ongoing, regular adjustments and quick pivots to learning design that can be more easily implemented.
What is a Flexible Syllabus?
A flexible syllabus is a useful tool that instructors can build to fit any classroom model. As one of many tools that can aid in increasing communication and transparency in course design, a flexible syllabus provides a vehicle for quick adaptation within the parts of normal syllabus development that are most open to instructor control. For example, where the initial time frame of a course calendar may need to be adjusted quickly to accommodate timeline changes due to unforeseen emergencies, a flexible syllabus becomes an ideal location for communicating updates. What’s more, instructors interested in collaborating with their classes on elements of course design such as assignment deadlines, rubrics, project goals and outcomes, and more can quickly and easily update that information on an ongoing basis via a flexible syllabus.
While a traditional syllabus is still the standard by which curricular approval processes and institutional records are maintained, the flexible syllabus can operate as an auxiliary tool that can be utilized week-to-week or class-to-class as instructors plan and reflect on students’ ability to meet expected learning outcomes, and to transparently pivot if they deem changes to course design for the students in a particular iteration necessary.
A flexible syllabus typically lives on a digital platform that can be updated and modified to fit the needs of your unique learning environment. An advantage to using a flexible syllabus includes the ability to update and share new or changing information with your students in real time. This makes disseminating new and important information quickly and efficiently an easier task than it may have been previously if you have been used to relying on a traditional, static syllabus format, such as Word documents or PDFs. Additionally, it gives students the option to access information via tablet and/or mobile device.
Is a Flexible Syllabus Right for My Classroom?
If your course design relies heavily on a fixed progression of subject matter, you might find that the time necessary to invest in building a flexible syllabus is not right for you. It takes time to get used to design potential of the platform that you will use to host your flexible syllabus before adding any content. If it seems likely that the content, course outcomes, and calendar that you will adhere to won’t change, then a traditional syllabus might well be a better fit.
However, in classrooms where instructors are finding a need to introduce more course design flexibility as the term progresses, a flexible syllabus might be a good fit.
Using a Flexible Syllabus with Students
If you are unsure how you might ask your students to engage with you in your plans to use a flexible syllabus, here are a few ideas to get you started:
Before the semester begins, consider sending an email to students sharing a link to the flexible syllabus and drawing their attention to places in the syllabus where you would like to invite their collaboration. You can then make time during the first week of the term to arrange a discussion and make decisions together. This can include:
- Assessment and activity due dates and timelines
- Grading rubrics and assessment criteria
- Scaffolded assessment planning, including descriptions, outcomes, and/or group work ideas
At the start of term while you are orienting students to the course and your preferences for the learning community, identify a few key places in the syllabus that are not finished and invite students to begin to think about how they would like to see those areas develop. You can communicate when you plan to update these items and give students an opportunity to review these changes and offer further feedback. This allows students to experience your use of an iterative design and planning process. Some items that might function well under these circumstances are:
- Setting parameters for any planned group assessments or activities.
- Finalizing due dates for your course calendar.
- Selecting required and recommended reading or viewing material.
As you reach the latter part of the semester and your students are preparing for their culminating assessments and activities, you can leave space in your syllabus for a few flexible options:
- Flexible timelines – state this explicitly so that students know that you have intentionally built in enough time for flexibility and that these dates might be changing frequently at the end of the term.
- Resources – often, culminating assessments and activities benefit from sharing parallel and additional helpful content that is not explicitly covered as a part of your course plan. Giving ample space to include this as it arises and provide it to your students is valuable, and you can also invite students to share their favorite resources as well.

How can I Get Started?
The two platforms that we used to build our flexible syllabus examples are fully available to OSU faculty, staff, and students, and offer potential for uses in other aspects of learning design. The first example is built using the u.osu.edu WordPress supported platform. The second is designed using Adobe Express. In both cases, the flexible syllabus is prepared using the ASC Distance Learning Syllabus Template as a guide.
Flexible Syllabus Option #1: U.OSU.EDU
This first option for building a flexible syllabus was created using the http://u.osu.edu/ WordPress supported blog site that is available to all OSU faculty, staff, and students to use for personal, community, or classroom needs.
In the left-hand "Dashboard" menu, you can select appearance to choose the blog themes (5 to choose from), as well as design the appearance of menus, widgets, and other tools. This may take some time, but feel free to play around with the design that you think will work best to display your information to your students. Flexible Syllabus Option #1 was designed using the "Ohio State Light" theme.
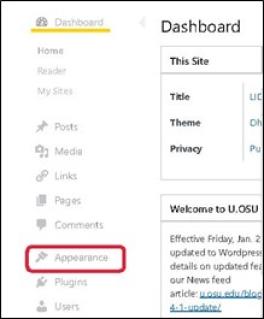
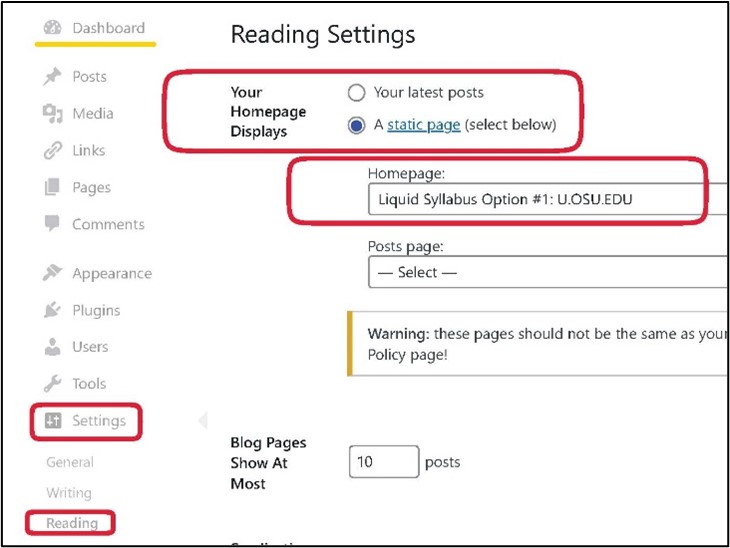
The "Welcome" page in this example is incorporated as a part of the landing page. It begins directly beneath the heading “Welcome To Our Course.” You can set this as your “Front Page” in “Settings”>>”Reading” under your Dashboard menu.

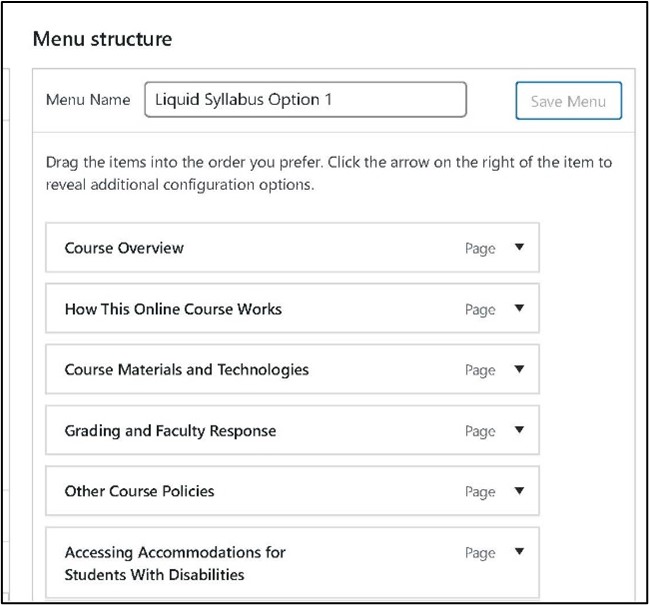
Make sure that your page labels are clear and reflect the content that students can expect to find. For this flexible syllabus template, the sections follow the ASC Distance Learning Syllabus Template (more info about this template and the distance learning curricular approval process can be found by following the link).
Making sure that your menu mirrors the order in which you want your students to access syllabus content will help reduce confusion and ensure that students can easily navigate to find what they need. This can be controlled under “Appearance”>>”Menus.”
You can control the visibility of this site and add password protection from “Settings” in the blog dashboard. Once you are done creating it, all that is left to do is share the link to your site—it is already published from creation. Then, you can share the link on your CarmenCanvas course page under a Module or within another content Page.
If you are interested in using the example option that we’ve created as a template, follow these steps:
- You will first need to create a u.osu site for your flexible syllabus. You can create multiple sites under your account to support multiple syllabi for your courses. If you are unfamiliar with the process or creating a new site using u.osu, you can follow the steps detailed here.
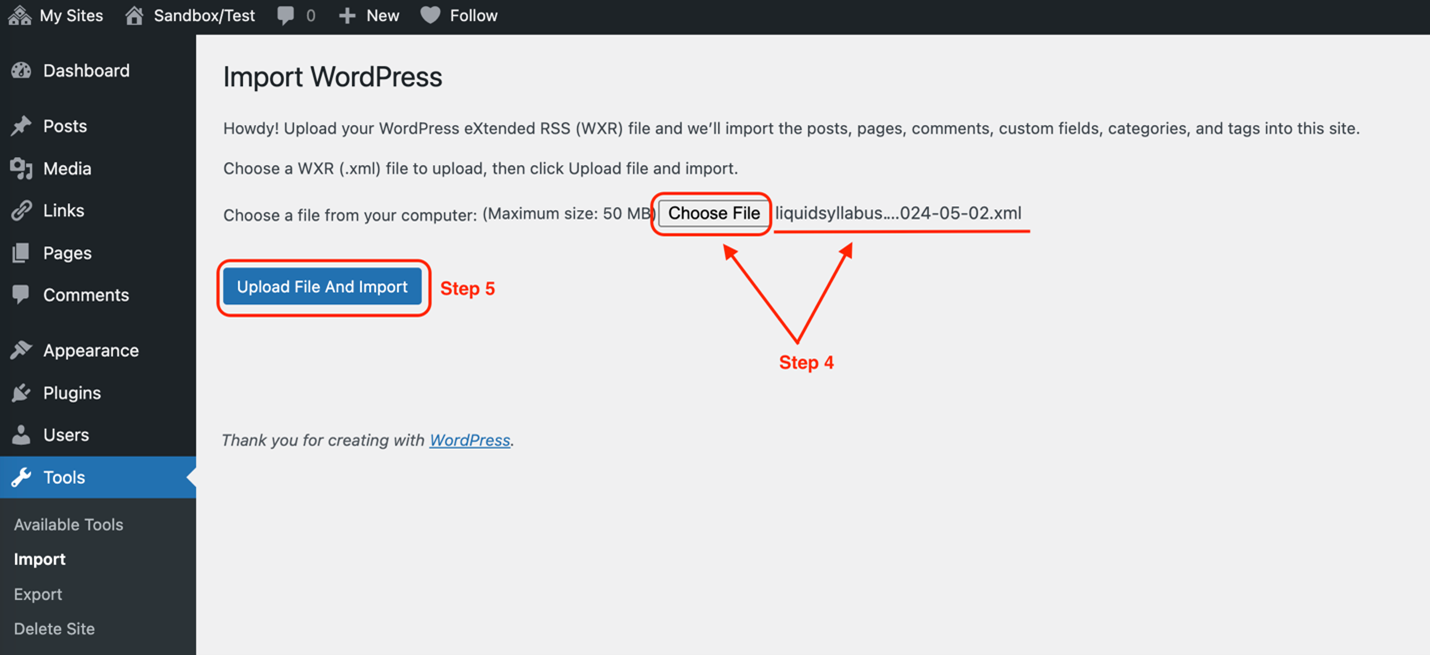
Once your site is created, from the dashboard of your new site, find “Tools” in the left-hand navigation menu and click on the “Import” option.

- Download this import package for the example site by clicking on this link (you will need to be logged in to Microsoft 365 using your Ohio State credentials to download).
- Select the option to “Run Importer” under the WordPress option, then select the downloaded file from your device’s downloads.
Once your file is selected, click the blue button to “Upload file and import.” You may be asked to confirm a few other details in addition, but then the import should begin.
NOTE: you may still need to adjust a few settings for this template to appear as it does in the example. Follow the steps under the heading “Basic steps to using this platform to build a flexible syllabus” above to do this or reach out to request a consultation with an ODE instructional designer.
Flexible Syllabus Option #2: Adobe Express Syllabus, single webpage
This second option for creating a flexible syllabus for your course is built using Adobe Express. For this option, the syllabus page you create can be embedded into a u.osu.edu platform, or a link can be added to your CarmenCanvas course page.
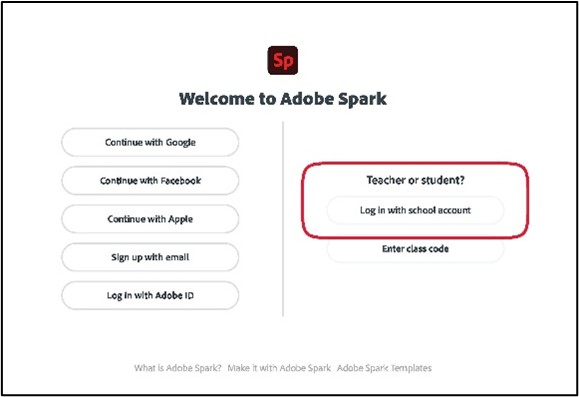
Creating a flexible syllabus webpage using Adobe Express is a reasonably intuitive process with a wide-ranging set of options. OSU faculty, staff, and students can login using their OSU credentials to use these tools to create presentations, graphics, or portfolios.
You should be able to do this from your personal device. A link to the login page can be found above.
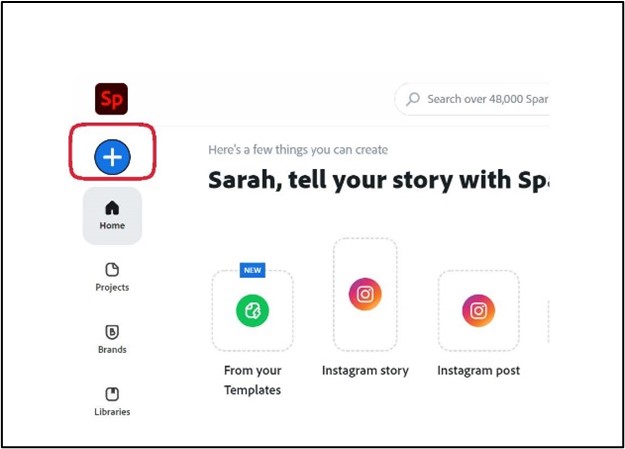
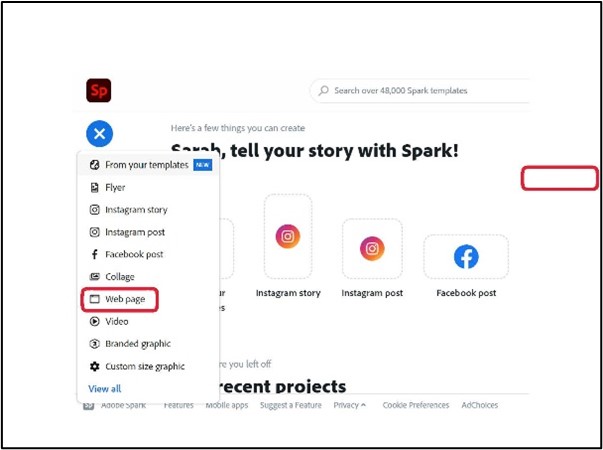
Click on the BLUE "+" button located in the top left-hand corner under the Express icon. From the menu that opens, select "webpage."
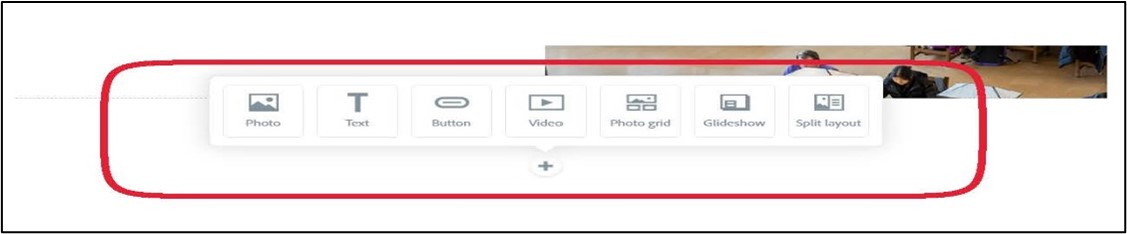
It may take some time to get used to the design elements available to you. The template we created includes Photos, Text, Buttons, Videos, Glideshows, and Split Layouts (with photos and text/video/buttons). If you need to create your flexible syllabus in multiple sessions, Adobe Express will auto-save your work. The next time you login, you can pick up wherever you left off. For this flexible syllabus template, the sections follow the ASC Distance Learning Syllabus Template (more information about this template and the distance learning curricular approval process can be found by following the link).
Once you have everything in place, click "Share" at the top of the screen. This will give you a few options, including "Publish and Share Link" and "Print." Here, you will be able to copy and paste or embed the link. If you make updates to your syllabus at any point during the semester, clicking on "Share" will give you the option to update your link. Anywhere that this link appears, your content updates when you select this option.

If you are interested in using the example option that we’ve created as a template, follow these steps:
- Login to Adobe Express using your OSU credentials.
- Once logged in, click on this link to access the Adobe Express flexible syllabus template. This should open a shared version of this template in your browser.
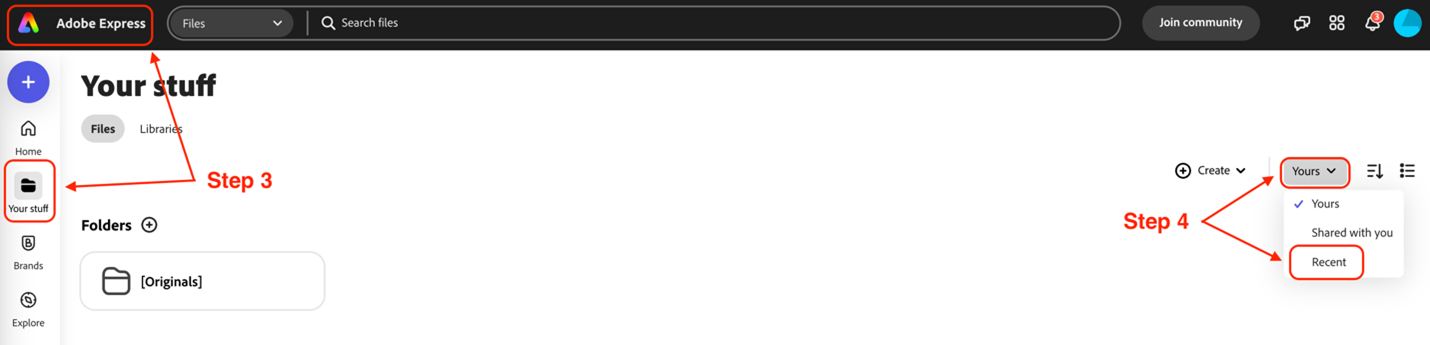
- Return to your Express homepage by clicking on the Adobe Express symbol in the top, left-hand corner, then click on “Your stuff” from the left-hand navigation menu.
From this screen, you’ll see a label at the top of the screen that reads “Yours” with a downward facing caret symbol next to it. Click on this and select “Recent” from the drop-down menu that appears. You should see the Flexible Syllabus option appear on this screen.
Hover over the thumbnail image of the flexible syllabus and click on the three-dot more option menu button.

- From the drop-down menu that appears, select the option to “Duplicate.”
Now you can rename and customize this template. Once you have everything in place, click "Share" at the top of the screen. This will give you a few options, including "Publish and Share Link" and "Print." Here, you will be able to copy and paste or embed the link. If you make updates to your syllabus at any point during the semester, clicking on "Share" will give you the option to update your link. Anywhere that this link appears, your content updates when you select this option.
Need Help? Have Questions?
NOTE: expand the options above to see details about using the above examples as a template.
If you are interested in designing a more customized flexible syllabus for your classroom, but need some help getting started, you can schedule a consultation with an instructional designer from the Office of Distance Education in the College of Arts and Sciences.
If you are having trouble navigating this resource, or if you have any questions, please reach out to ascode@osu.edu.