Enhance Your Course Design and Increase Student Engagement with Creative Carmen Pages
Setting up Pages within Carmen allows you to display a range of content and resources for students that includes items such as text, images, videos, audio, and documents. Pages can be easily duplicated, linked to other pages, copied and shared with other instructors, or copied and imported to another course taught by the same instructor. Pages are generally used for content and items that do not necessarily belong within an Assignment, Quiz, or Discussion post.
For example, within the ASC Distance Learning Course Template you will find templates that utilize Pages to present course and module overviews and instructions, introductions to reading content or author bios, lecture videos, and more. These templates incorporate best practices grounded in a wealth of evidence-based research in online education and form the basic foundations for quality online course design; however, in terms of the ways in which Carmen Pages can be utilized within a course, these templates only scratch the surface of what is possible.
The descriptions and examples below speak to a few more creative possibilities for the ways in which Carmen Pages can be designed and incorporated using techniques that go beyond static content to increase interactivity, collaboration, and engagement within the course.
Ways to Build Community and Collaboration in Your Course
Have you been searching for new ways to increase community building and collaboration within your course, but you don’t want to burden students with learning additional technology or overwhelm students by requiring a host of different platforms? Carmen Pages provides a tool that allows students to collaborate with the instructor and/or their peers directly in Carmen, beyond the use of traditional discussion posts.
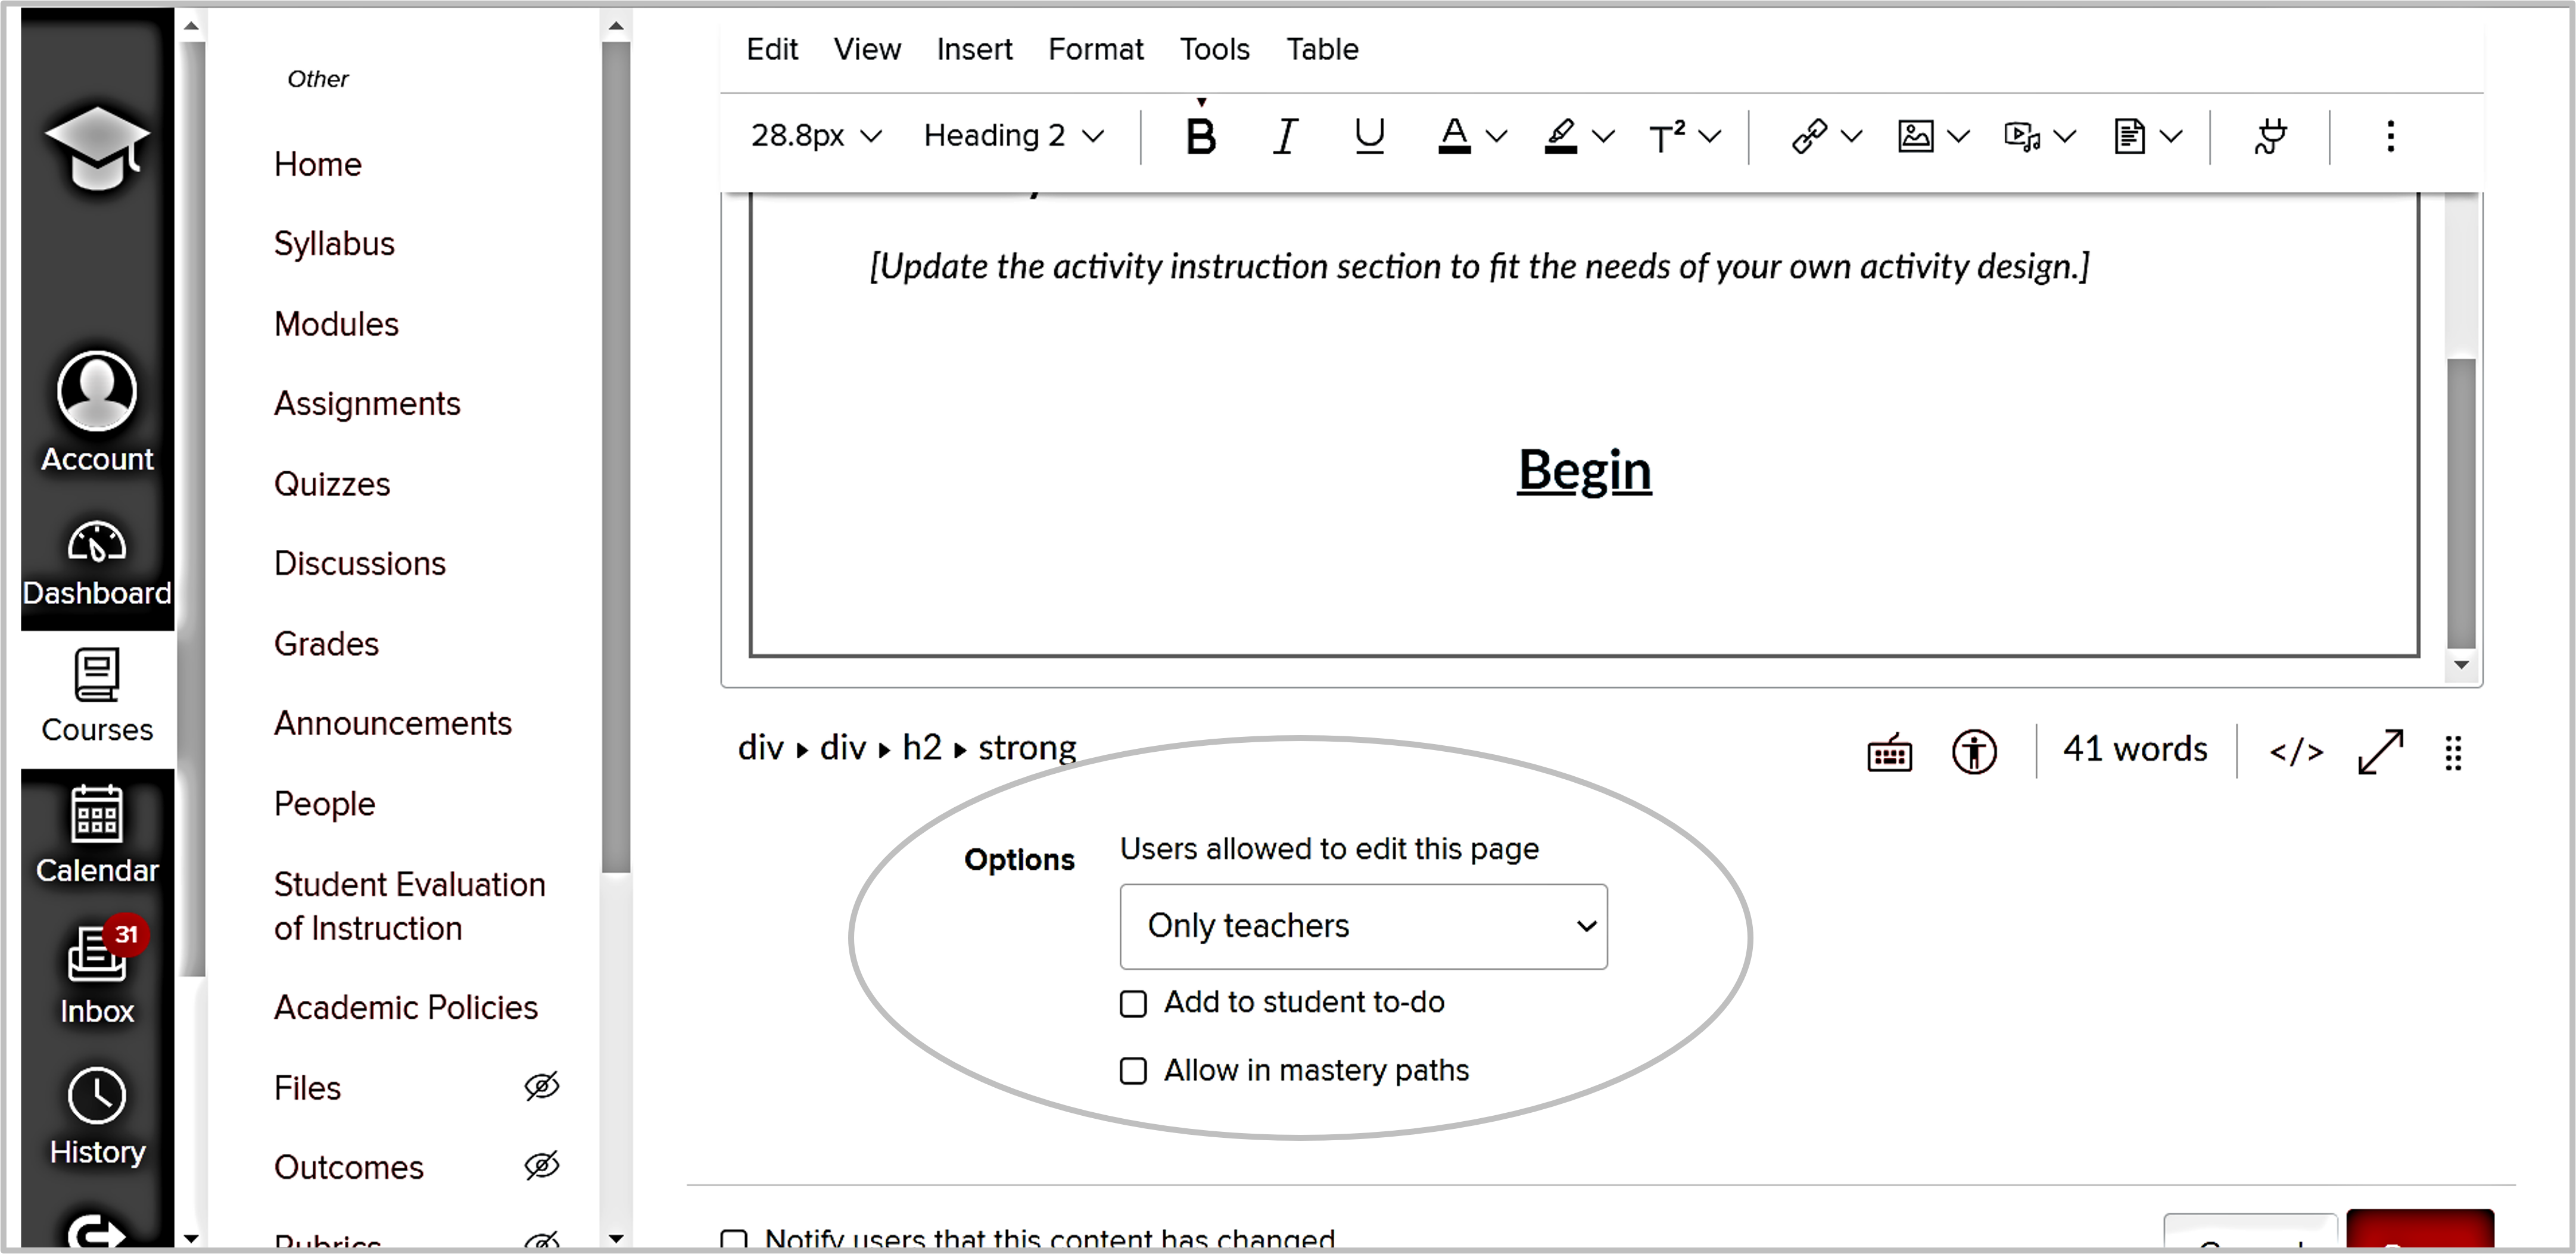
If you create or open a page in Carmen and click the Edit button near the top right of your screen, the Rich Content Editor and tool bar will appear. Just beneath the Rich Content Editor is an Options dropdown menu (see Fig. 1) that allows you to change which users can edit the page. The default setting is “Only teachers” can edit the page, but when you click the dropdown, additional options appear including “Teachers and students” or “Anyone”. By changing this setting to “Teachers and students” you can give access to your students to edit and collaborate on that individual page. By changing the setting to “Anyone” you can also grant editing permissions to graduate assistants, permissions that they may not otherwise have because of their assigned role in the course.
Beneath the dropdown menu, you will also find additional settings that allow you to add the task to a student’s calendar or To Do list, as well as an option to include it as a task that can be added to Mastery Paths (for more about Mastery Paths see the resource article provided by the Office of Distance Education.) Though these settings won’t cause the task to appear directly under Assignments, it still provides a way in which you can connect this collaborative task to a deadline or to a specific learning objective.
There are many ways in which Carmen Pages might be used as a collaborative tool by simply enabling this option. For example, it could be used to create a classroom blog or Wiki page around specific topics. It could also be used to create an ongoing resource list for the class in which students are required to do their own research and add additional resources that they have discovered that may prove useful to other students. Separate pages could also be assigned to smaller groups of students, requiring each group to complete a given task and design and develop their own page. These individual group pages could then be collected and linked together to create a larger class project, adding purpose and meaning to these smaller tasks by incorporating them into a significant framework that will be utilized by the entire classroom community.
Ways to Improve Student’s Self-Efficacy and Relatedness to the Content
Have you ever wanted to provide additional, ungraded practice questions or scenarios for students to allow for greater exploration, mastery, and connectedness to the material, but didn’t want to do so using Quizzes in Carmen out of concern that it may create additional anxiety or pressure for students? One way to provide supplementary practice without inducing such anxieties is by using a series of connected pages in Carmen.
Carmen Pages can be used to create a series of sequential questions and automated feedback. This approach involves creating several individual question and feedback pages and then connecting the pages together via a button or text link. The process may require a bit more effort up front to create all the pages necessary and to ensure that every possible answer is connected to helpful feedback. But once the foundational pages have been created for the first question, you can simply duplicate pages and update the content and links to complete the process for any additional questions you might wish to include. Once all the pages have been designed, content has been updated, links have been tested, and the pages have been published, students can begin to answer questions and receive feedback with little to no additional work required on the part of the instructor.
One limitation to this approach is that open-ended responses cannot be incorporated easily into Carmen Pages; instead, the best and easiest way to assess students’ understanding with this type of format is to limit the response options to true/false or multiple-choice answers. By limiting the responses to these format types, you can more easily create pointed, automatic feedback within separate pages that are then linked to the corresponding response options. To provide feedback for each possible answer, a separate feedback page can be created that displays commentary in whatever format you choose (e.g., text, video, audio, external link, etc.). Of course, this feedback should indicate whether the student’s response is correct. If their answer was incorrect, the feedback commentary could then either a) prompt the student to think about a particular concept or idea that they may not have considered based on the answer selected and then could require them to try again by directing them to return to the question at hand, or b) immediately provide the correct answer and a detailed explanation about why the answer they chose was incorrect.
The benefit of creating practice questions using Pages versus Quizzes in Carmen is that it eliminates some of the recognizable design elements found in Quizzes, such as the initial information page that specifies the quiz type, number of points, time limit, number of attempts allowed, etc. Because these elements do not appear and are not needed within Carmen Pages, students may be less likely to immediately associate these activities with quizzes or other tasks that would normally feel more high stakes by design because the overall layout is a change from the standard Carmen Quiz or Assignments features to which students have become accustomed. By removing, or at least minimizing, the association to these higher-stakes assignments, you can create a space in which students’ may be more willing to take risks and explore the additional content in more depth, as they know they won’t be penalized for doing so. It allows students’ behaviors and goals to move away from simply achieving perfection and towards those that seek to further their understanding and enhance metacognition.
The video tutorial below provides a brief demonstration of how you can use Pages to create practice questions for students. The example utilized in the video is set up as a trivia style activity meant to check students’ knowledge on the topic of Career Success. Prior to completing this activity, students were required to watch a series of short content videos provided by The Center for Career and Professional Success. The full example is available within Carmen Commons if you would like to see more details and/or import the example or corresponding template pages into your own course(s).
Branching scenarios offer a means in which instructors can introduce real-world situations, problems, and simulations into the classroom. Branching scenarios can be created and utilized in a similar way to the ungraded practice and survey questions described above. The key difference with branching scenarios is that the actual content is slightly more involved. Instead of a series of pointed, sequential questions, branching scenarios generally incorporate more detailed background information or narrative storytelling around a specific situation or problem that then requires students to make a decision about how they would approach the problem or question at hand.
In terms of the ways in which students can respond, the branching scenario pages should limit the response options available to a predetermined list, utilizing a multiple-choice or true/false style format, for the same reasons discussed in the above example that covers the use of Pages with practice questions and activities. The primary difference between the low-stakes practice activity example and branching scenario activities appears in how the feedback for each response functions and prompts students to move forward in the activity once they have selected a given answer.
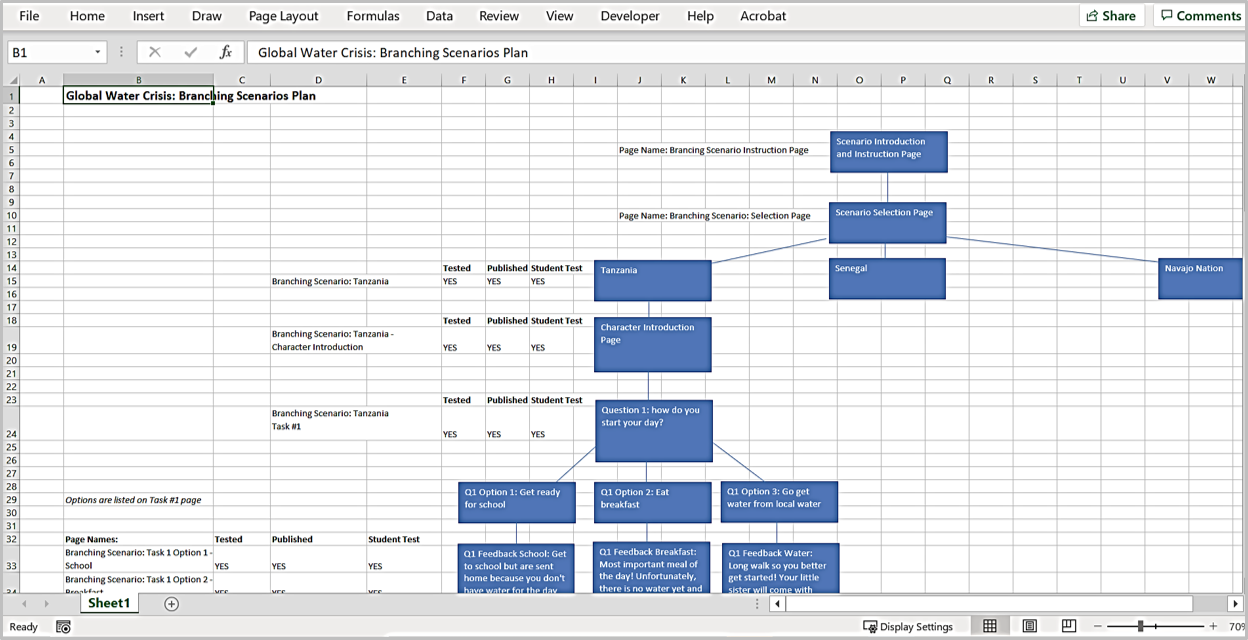
With branching scenarios, the feedback is generally not a direct correct or incorrect response that then continues along a single trajectory. As the name suggests, each response that is part of a branching scenario branches out along different pathways, presenting students with additional tasks, situations, and/or problems that arise as a result of their previous responses. Because of this, one of the most difficult aspects of using Pages to create branching scenarios in Carmen is organization and keeping an extensive number of Pages and links from becoming too overwhelming to manage. To ease some of this burden, it is beneficial to first map out each scenario and possible pathways outside of Carmen before creating your actual Pages and linking them to one another. Using consistent and clear naming conventions can also ease the challenge of keeping track of a multitude of pages and links. Figure 2 below demonstrates one way in which you might map out your branching scenario using shapes and text in Excel. This particular example provides a visual branch, key text associated with each element of the scenario, and a list of page names to help keep all of the information organized and easy to track as the scenario is being built in Carmen.
The video tutorial below provides a brief demonstration of how you can use Pages to create branching scenarios in Carmen. This activity attempts to walk students through what it is like to live in an area challenged by a water crisis after they have already explored some basic facts about water, how much water is used on a daily basis within our own households, and the determining factors (e.g. climate, economics, gender, race, etc.) that connect to create water crises around the world. Following the activity, students would be asked to identify the determining factors that led to the water crisis in the specific area they explored before continuing on to a critical thinking activity where they are asked to identify the solution that would best resolve some of the issues faced in that area.
This particular branching scenario example demonstrates one of the three location branches: Tanzania. Pages are used to provide students with background information about the area, introduce them to the character role that they will take on over the course of the scenario, present situational challenges in which students have to make a choice about how to use their resources, and pages that provide feedback based on the specific response chosen. The full example is available within Carmen Commons if you would like to see more details and/or import the example or corresponding template pages into your own course(s).
*Pro Tip: Be sure to publish all of the pages used in the activity from your full-page list and do a run through in student view to make sure that the activity works as intended and no links are broken.

Ways to Increase Student Engagement with Video Lecture Content
Lengthy lecture videos that require students to primarily listen passively to the content or those that lack direct, embedded interactivity can quickly become disengaging for learners. Several studies have found that the optimal length of instructional videos – for the purpose of maintaining engagement – generally ranges between six to fifteen minutes. So, what do you do if you have a 55-minute video lecture? Without access to or knowledge about more sophisticated technology, what can you do to improve student engagement with this type of material?
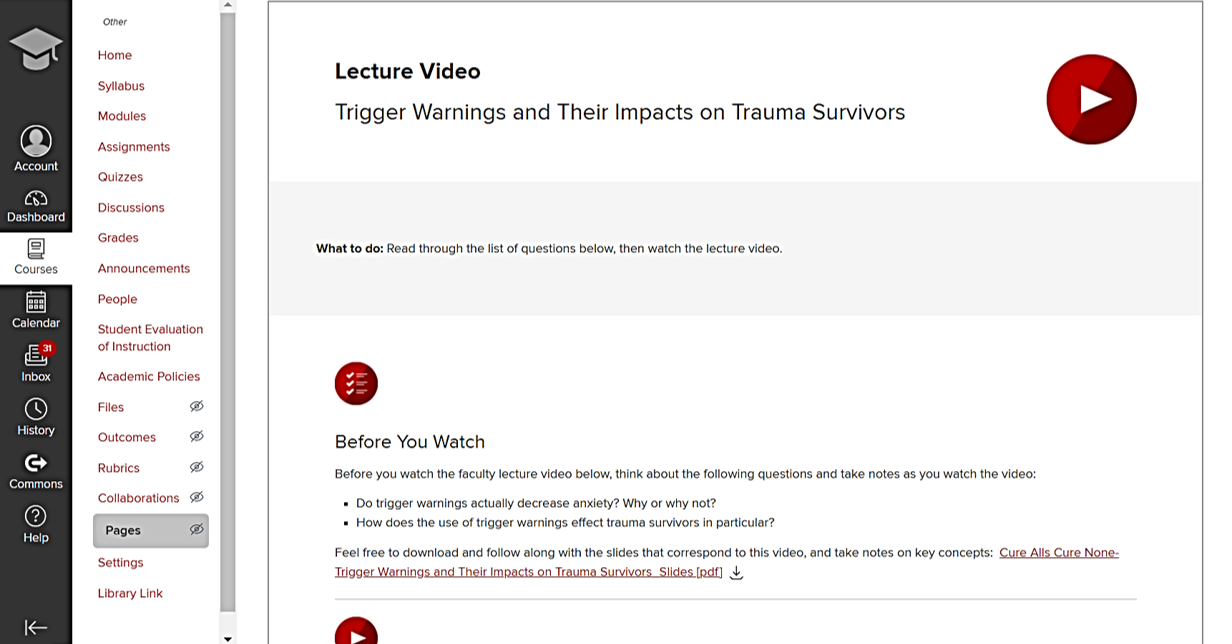
One solution is to chunk the longer video into shorter segments that are followed by comprehension questions. Each video can be housed on a standalone Carmen page that provides an overview of what students can expect from the video and/or a list of questions that they should consider before, during, and after their engagement with the content (See Fig. 3).
A practice or graded quiz, graded or ungraded survey, poll, or any other form of comprehension check you might wish to include could then immediately follow the short video segment as seen in Fig. 4 below, to allow for active engagement from the students, as well as a means to measure whether or not they understood the present content before moving on to new content.
The option above follows a more traditional input/output approach where students gather information and then are assessed on their understanding, with the caveat that these embedded assessments are meant to be low-stakes, practice tools that encourage students to engage and explore the content, rather than to demonstrate their full mastery of the material.
Another way that instructors can incorporate interactivity into video content using Carmen Pages is to simulate Question and Answer sessions. This type of format works particularly well for content that is separated and delineated by key questions. It could also be a useful format for review sessions. Using Pages in this way allows you to simulate an in-person Q&A forum, where students can choose and ask questions of the content expert and immediately hear the responses. The key here is that the questions and answers should be pre-determined, and a full list of all possible questions made available to the learner. These questions could either be established by the instructor or they could be created and submitted by the students themselves, depending on what your ultimate goals and objectives are with the content.
If you already have a recorded lecture video, you can cut your video into smaller segments that would then be used as the video responses to the pre-determined list of questions. In this case, you would want to strategically generate your questions in a way that they naturally align with the video responses you already have available. If, on the other hand, you have the ability to record additional responses, you could incorporate questions submitted by students or add additional questions of your own and subsequently record any new materials necessary.
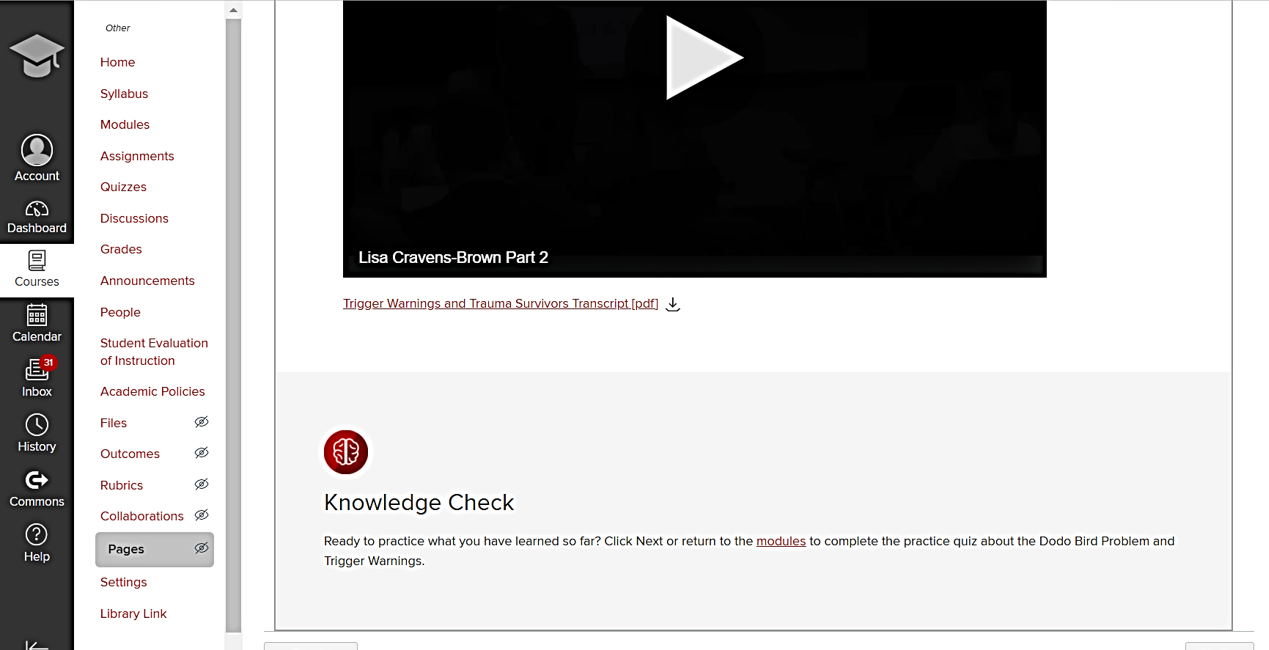
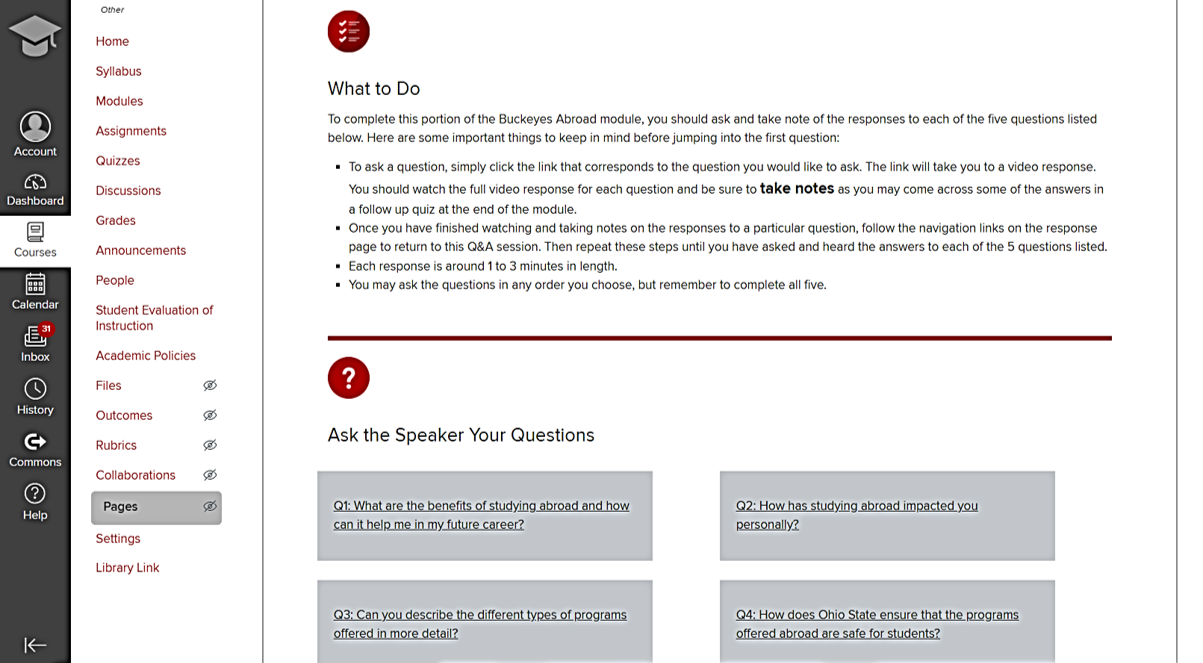
Once you have defined and created all possible questions and answers, the next step is to design a Carmen Page that will serve as the Q&A session landing page. The primary content on this page should include clear instructions as to how the students should interact with the materials, how many questions they are required or encouraged to ask, if and how they will be assessed on the material, as well as the full list of questions available (see Fig. 5).
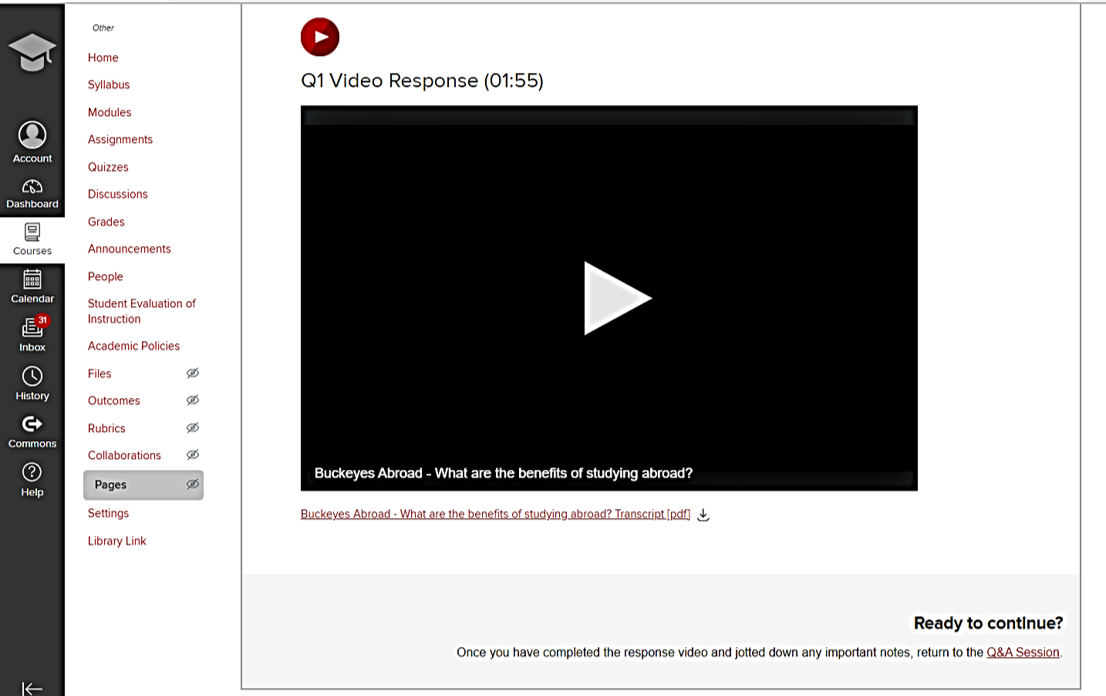
After establishing your landing page and full list of questions, you will then need to create an individual page for each response. These response pages can be relatively simple. They should restate the question somewhere on the page, include the video, audio, text, or other materials related to the actual response, and then provide a button or link that allows the student to navigate directly back to the Q&A landing page. Within the landing page itself, each individual question would then need to be connected via a text link or button to the corresponding response page. For an example of what this page might look like, see Fig. 6.
The tutorial video provided below offers a brief demonstration of how you can use Pages to simulate Question and Answer forums like this one. The full example of this activity is also available in Carmen Commons in the event that you would like to see more details and/or import the example or corresponding template pages into your own course(s).
Ways to Maximize Design Transparency in Your Course
Interactivity within Carmen Pages does not always have to follow a question-and-answer format as in the examples above. Pages can also be designed as an organizational tool that enables students and other users to more easily locate and access information.
If your course utilizes a range of materials, formats, technology, etc. – for example, you have synchronous sessions in Zoom, polls and attendance in TopHat, Discussions in Carmen, separate virtual lab modules, a reading list library, etc. – you may want to create a navigable landing page for the course as a whole, or even for each module, that helps students navigate to the materials they need with limited effort. The less effort students expend trying to find and access materials, the more time they have to focus on and explore the content itself.
One way to incorporate this type of navigation is by including a bulleted list of text links that direct students to the specific modules, pages, or external links that they need.
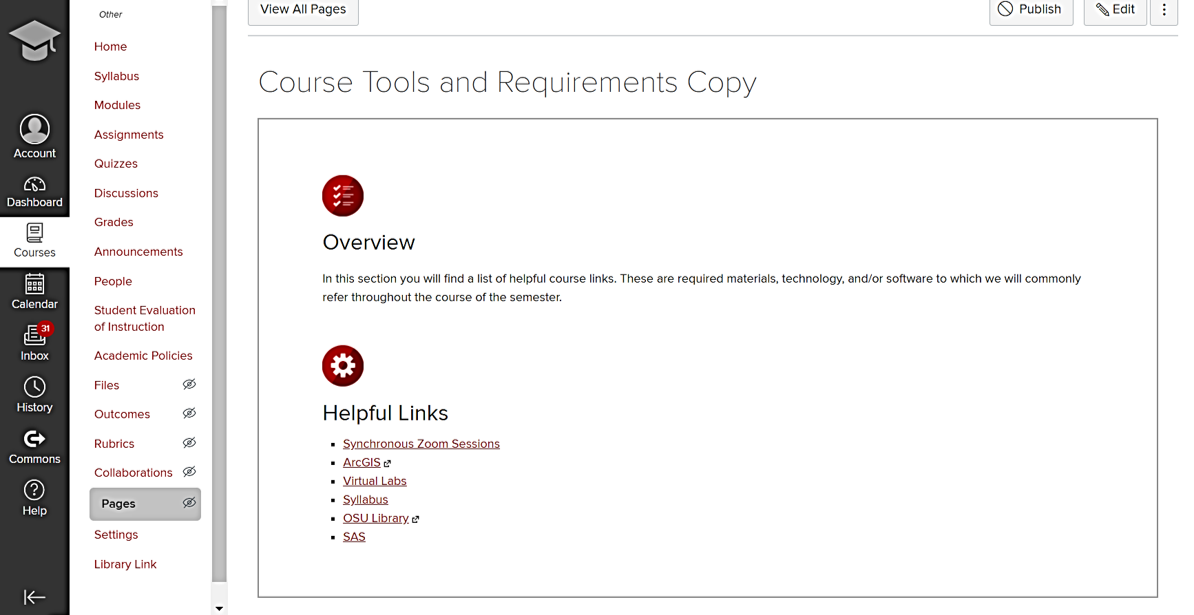
The downside to a text-only approach like the one shown in Fig. 7, however, is that a long list of hyperlinked text can quickly become overwhelming for users that experience various cognitive learning challenges. Adding both clear visuals and accessible formatting components to the page can help organize the content in such a way that all users can more quickly and easily find the information that they need when they need it. In addition, organizing these important course links on a landing page – as opposed to being buried in one of several pages that appear within the Modules portion of your course – can also improve student access by ensuring that it is the first page students see each time they enter the course.
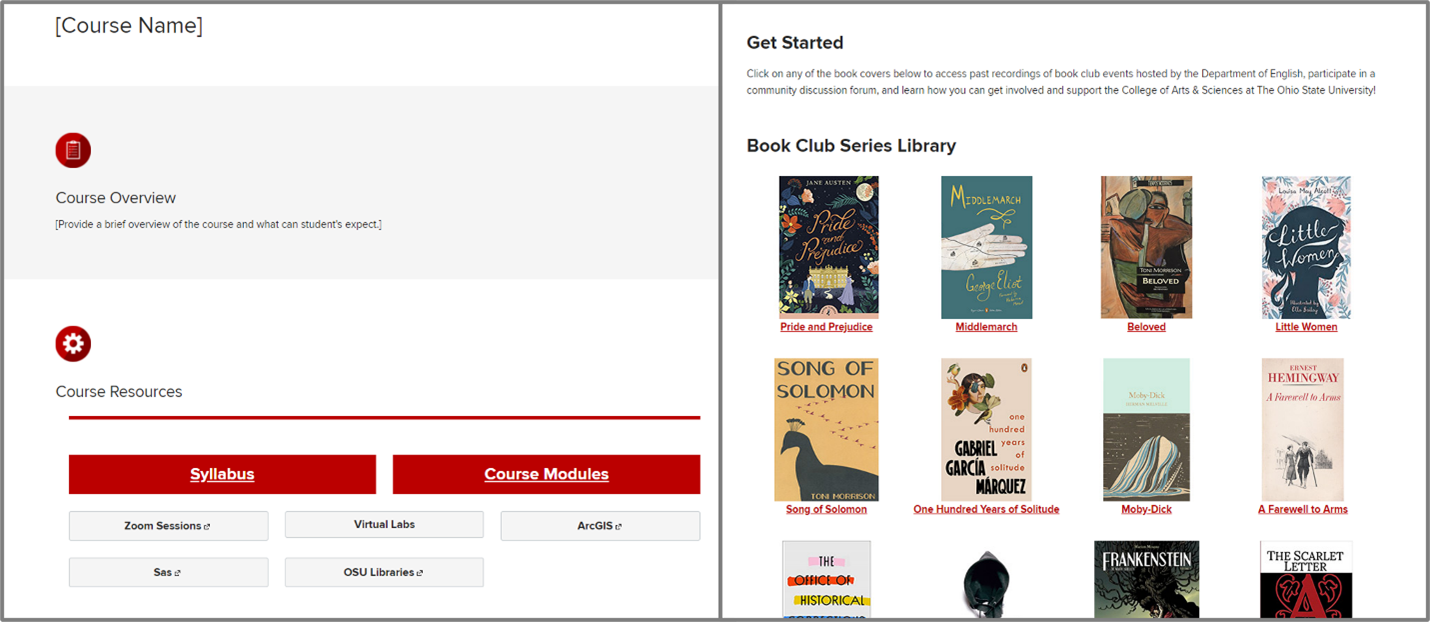
The formatting elements found in the examples in Fig. 8 above, specifically the use of columns and clear boundaries between items, allow learners that rely more heavily on visual cues to scan the page with less effort and avoid becoming lost in the text. One caveat of this approach, however, is that Carmen does not provide an easy tool for creating columns and some may be tempted to utilize the table function to format their content in such a way. Using tables solely for visual formatting purposes goes against some basic digital accessibility standards, as screen readers cannot appropriately read tables that are used in this way. To create neat, formatted columns and grids in Carmen, you need to use some relatively simple HTML code. Some of these useful codes have been documented within the module that we have prepared and shared in Carmen Commons specific to this resource. If you have little experience writing or using code, you can also create a homepage like the one shown above by importing the template from Commons and following the steps explained on the page itself or demonstrated in the tutorial videos provided both in this article and in the shared Commons module. If you still feel a bit uneasy about working with this type of formatting and design, you can set up a consultation with an instructional designer in our office who can help you to build and redesign your pages.
Ready to get started or need additional support?
If you are interested in incorporating any of the example activities discussed in this article, but are not quite sure where to begin, check out the Carmen Commons resource prepared by our office or schedule a consultation with one of our instructional designers today using the buttons below!